Testing OnCall's API using Postman
This guide will help you get started testing OnCall's API using Postman within minutes.
This guide is beginner-friendly
If you have a basic understanding of APIs, you'll have no problem following this guide.
Postman is an application you can use to test OnCall Health's API without having to manually create your own development environment. It also provides a consistent environment for troubleshooting errors that might arise as you build applications that use OnCall Health's API.
In this guide, we'll show you how to get started making requests to OnCall Health's API through Postman within minutes.
Before you get started
To proceed, you'll need an OnCall Health API key. Click here to read more about how you can obtain this key, which is currently only available to active customers.
If you'd like to use Postman through your browser, you'll also need a free account. Sign up here. You can also follow along with the desktop application, which does not require an account (although having one will still be useful if you use multiple computers).
Throughout this guide, we'll be using the browser version of Postman. When your account is fully set up, you'll arrive at a screen that looks like this:
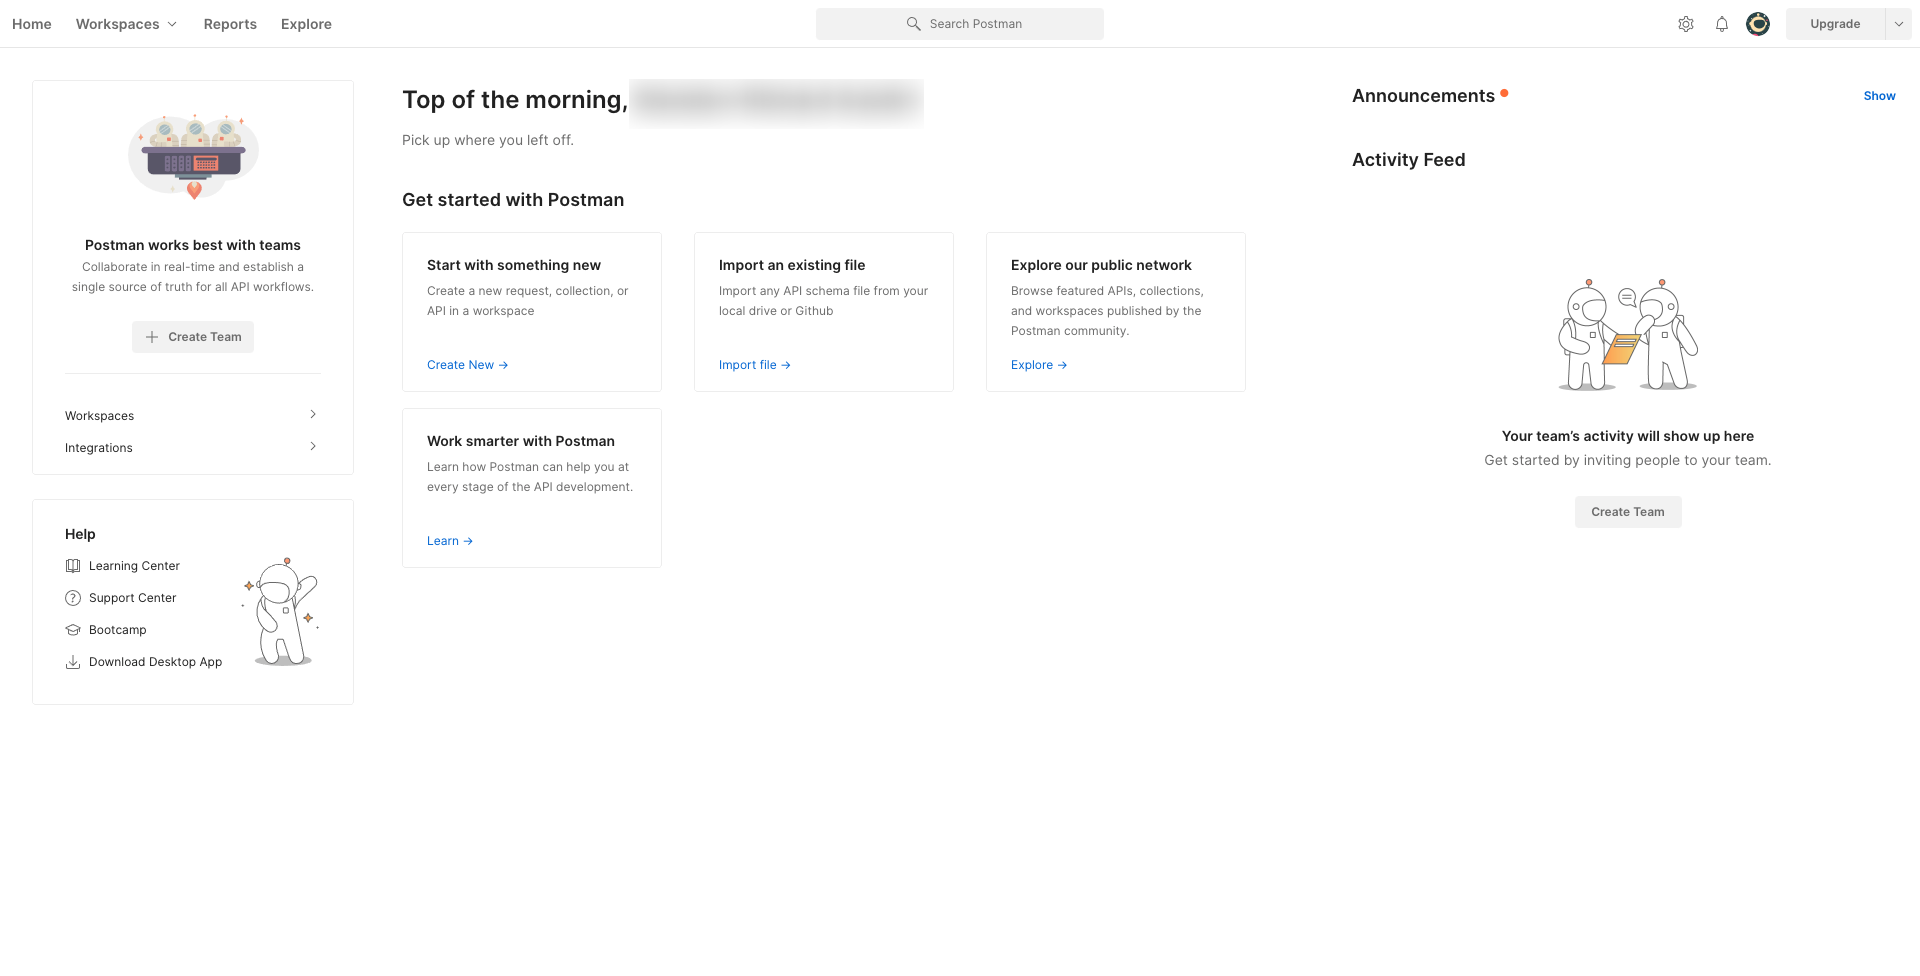
Lastly, make sure you're using a secure (non-shared) computer throughout this process.
Anyone who has access to your computer will be able to see your OnCall Health API key. This key can be used to access database records (appointments, patients, providers, etc) from your OnCall Health account so it should be kept private at all times.
Step 1: Click "Workspaces" in the navigation bar and select "My Workspace"
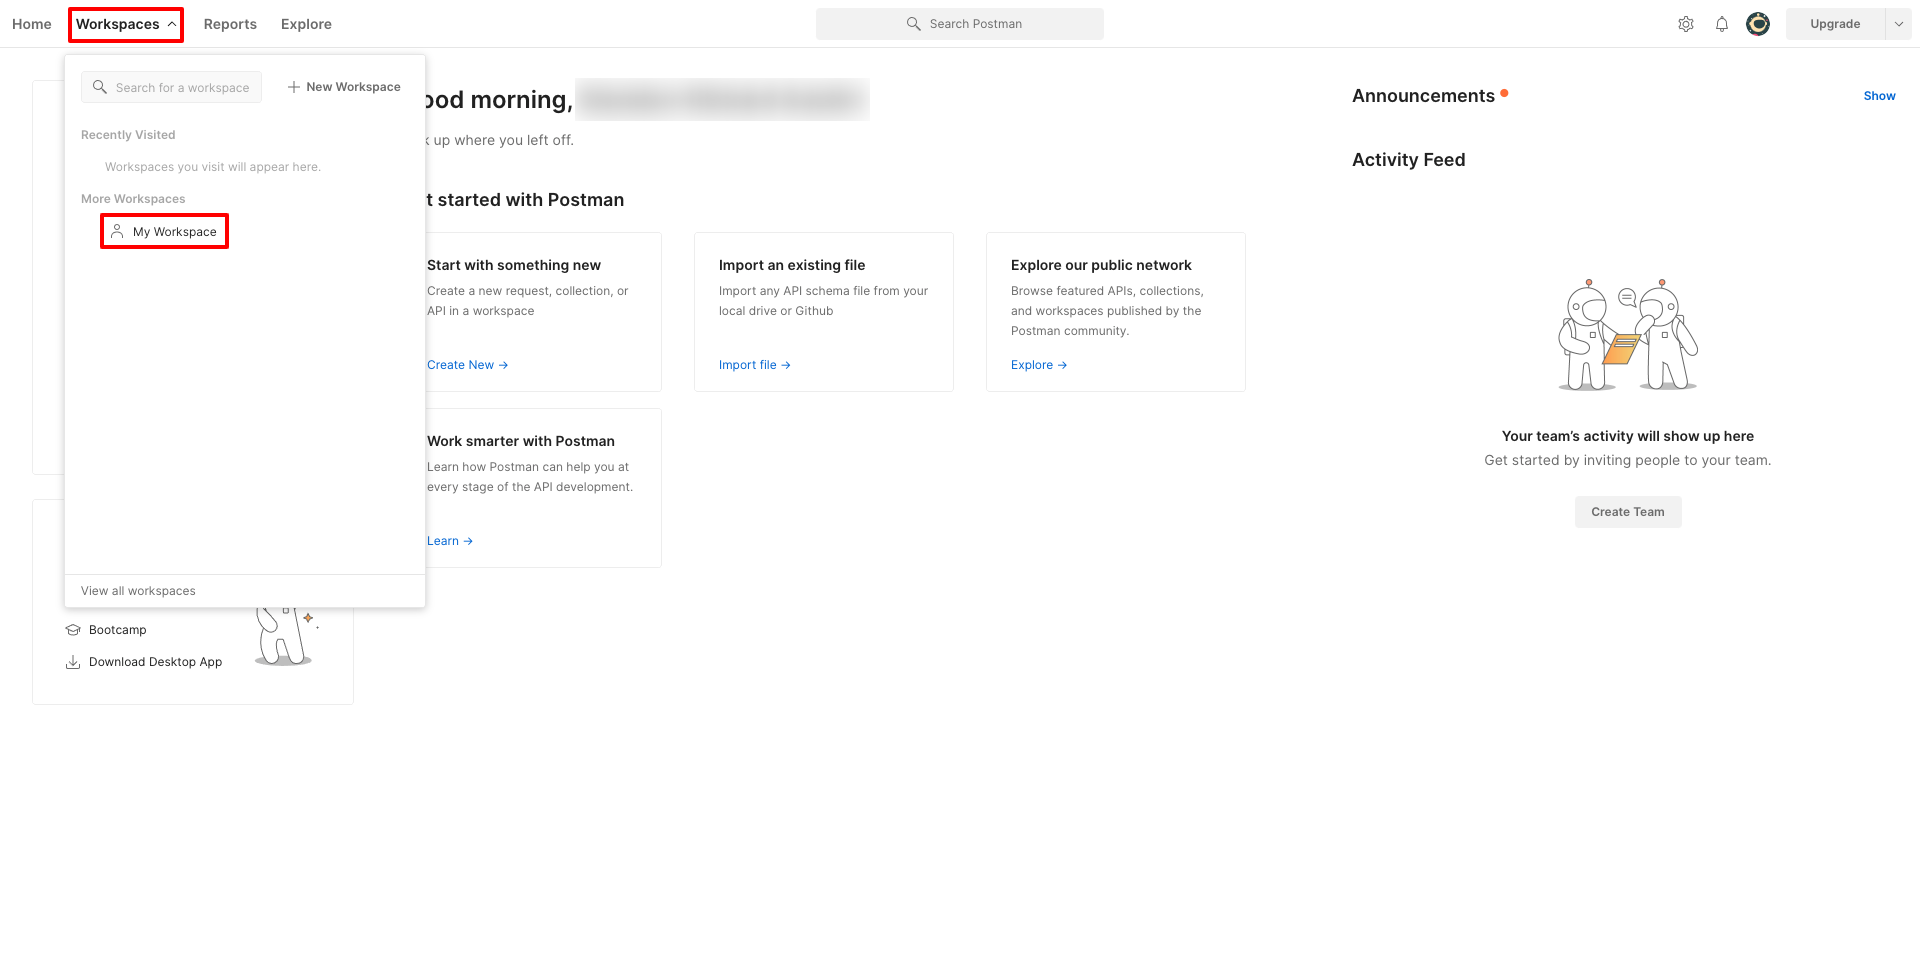
This will take you to a private workspace. API calls you make here will only be visible to you and anyone you invite.
Step 2: Click "Create a collection" in the sidebar under "Get started"
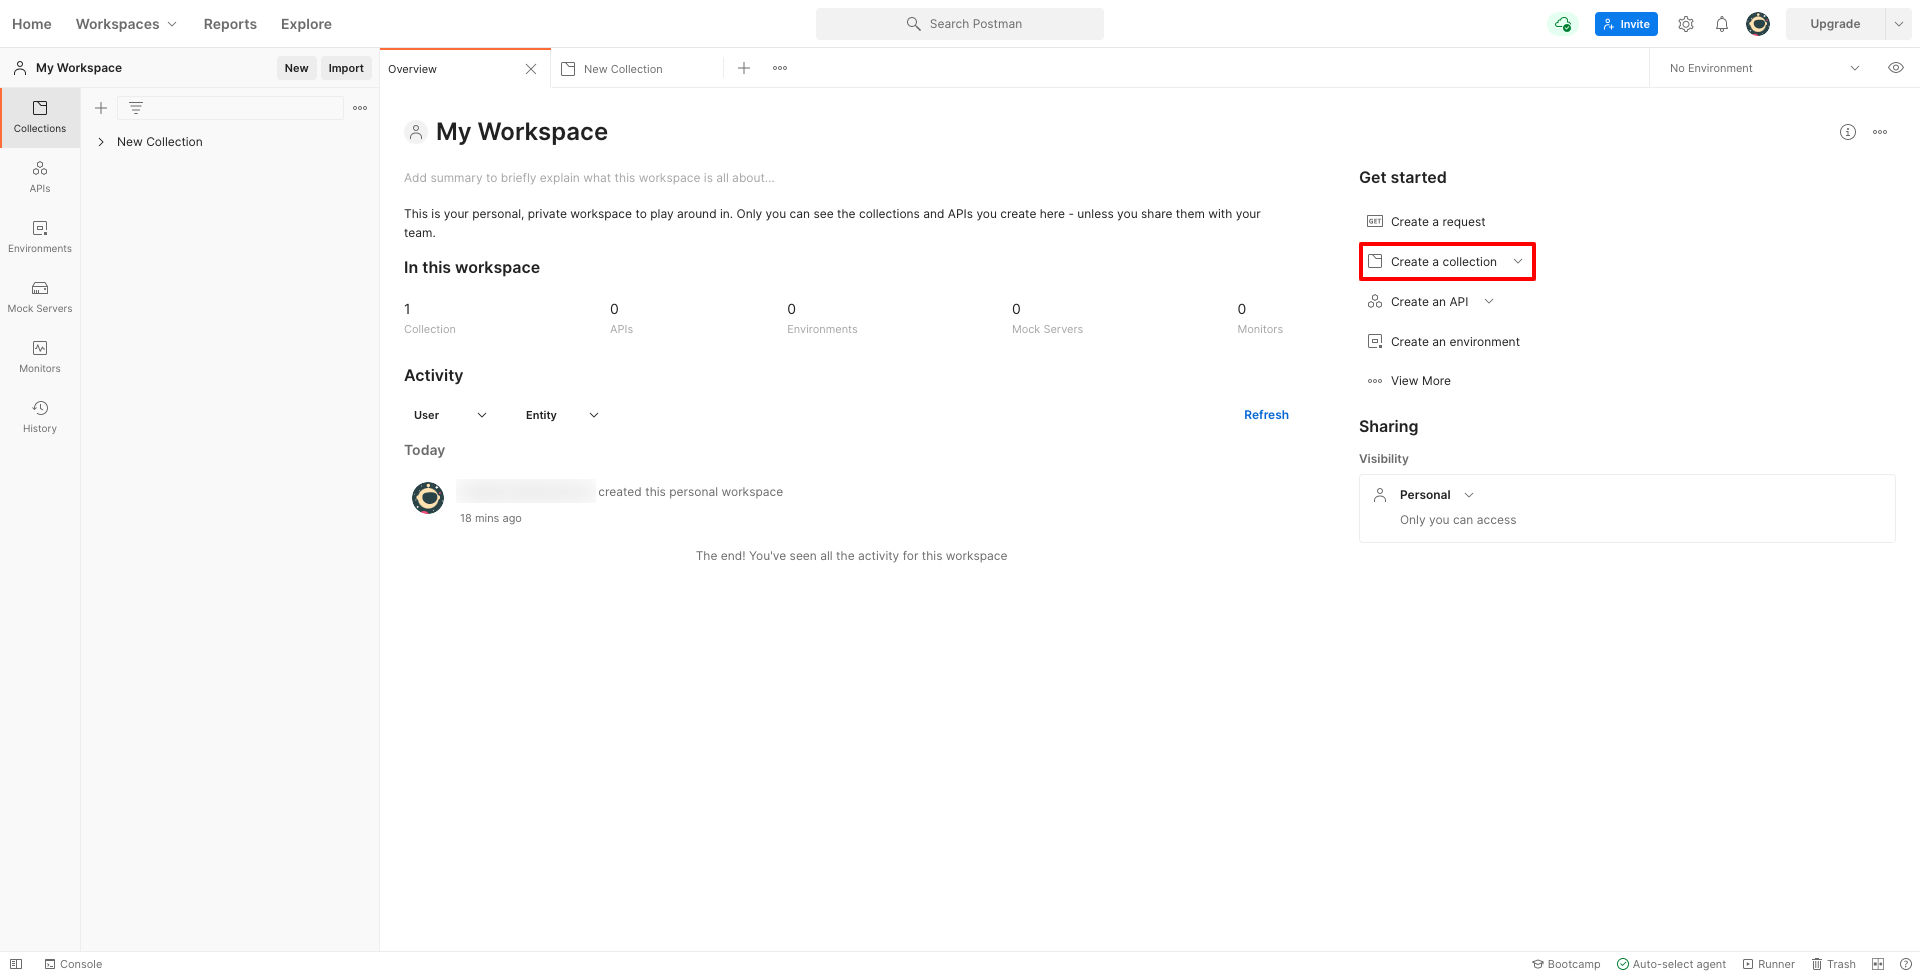
Collections in Postman allow you to group API requests and avoid having to enter the same data (such as your OnCall Health API key) for each call.
Step 3: Give your Collection a name
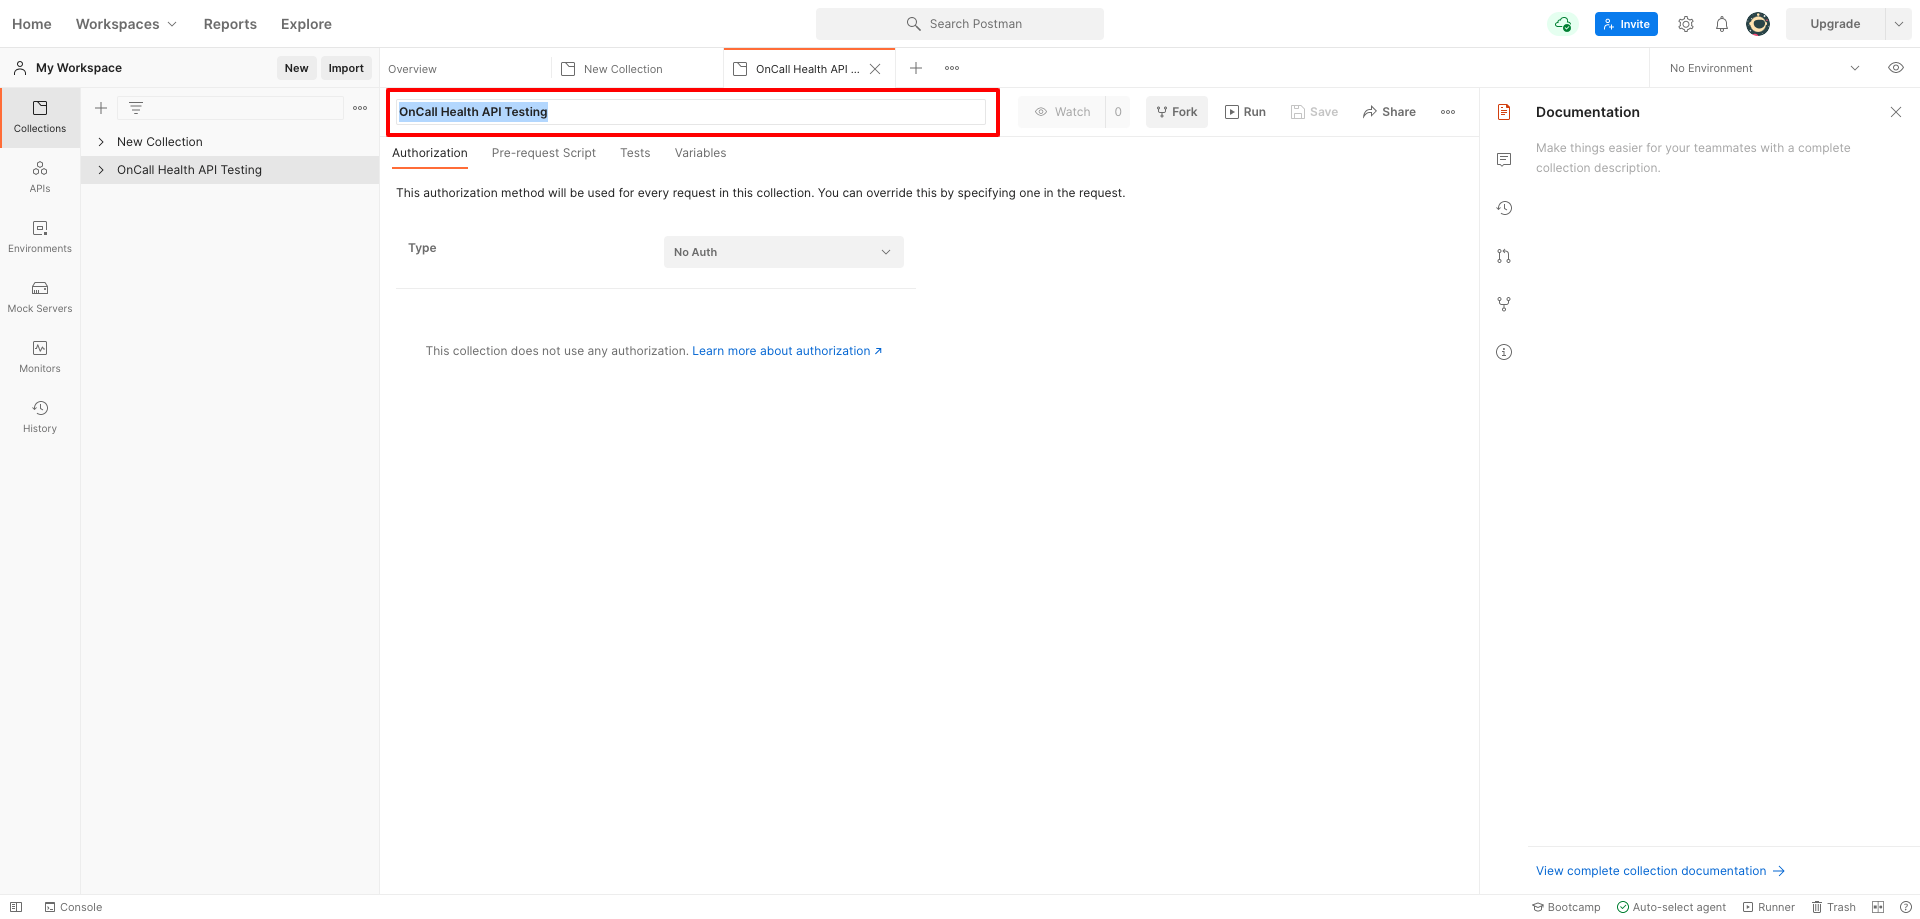
Step 4: Set up authorization for your Collection
During this step, you'll be setting your OnCall Health API key as the default authorization method for all requests made within this collection. This will prevent you from having to manually enter your API key for each request.
Make sure you're in the "Authorization" tab, then select "API Key" under "Type."
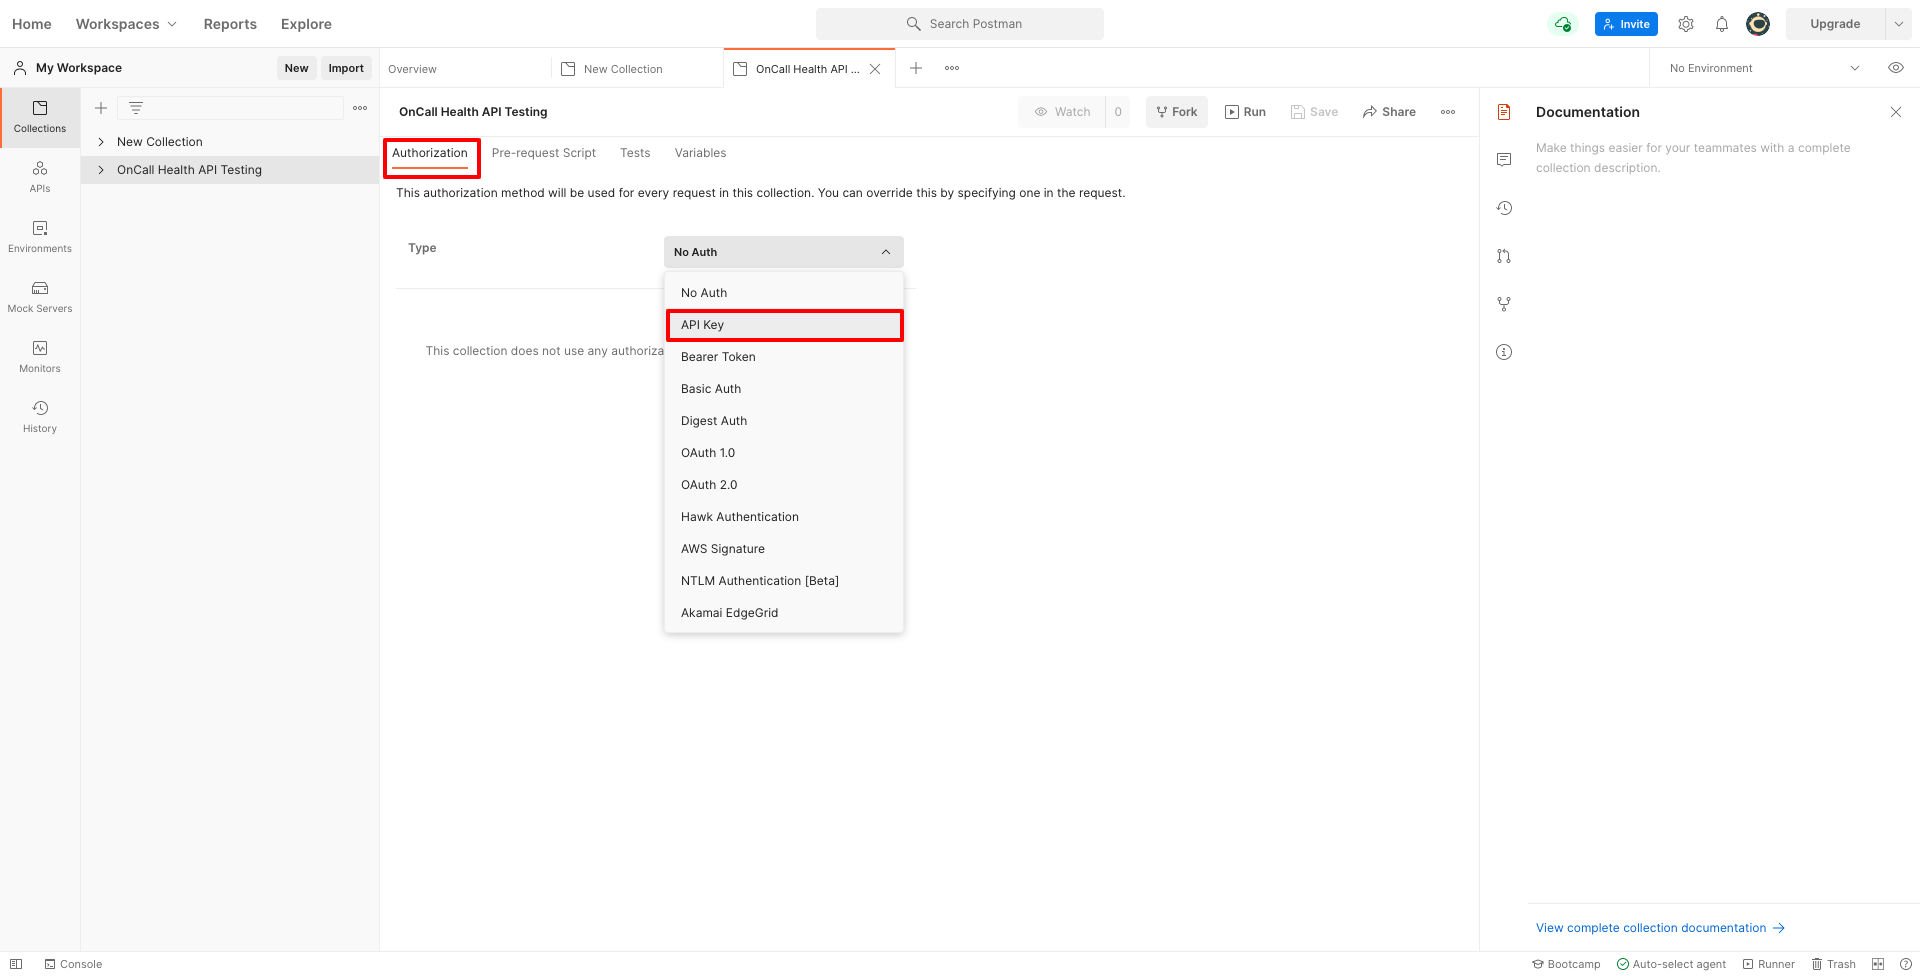
Next, enter "Authorization" in the "Key" field.
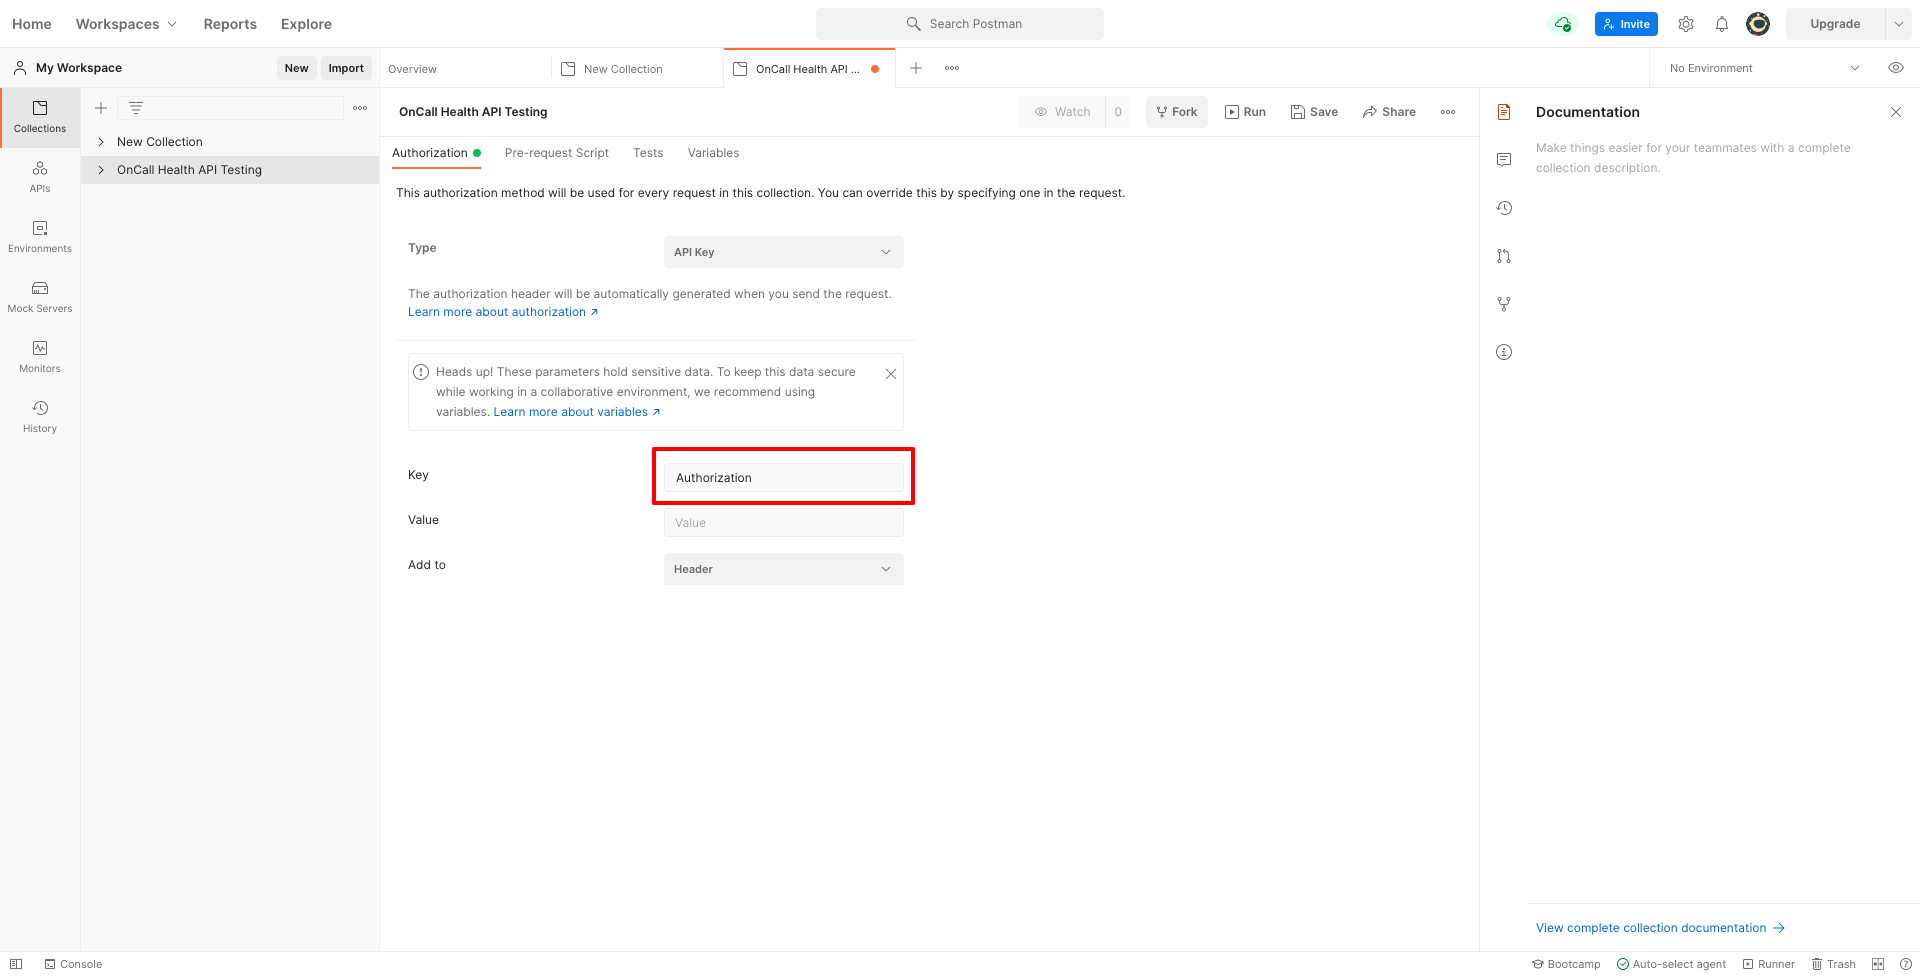
Next, enter "Token YOUR_API_KEY" in the "Value" field (replace YOUR_API_KEY with your OnCall Health API key).
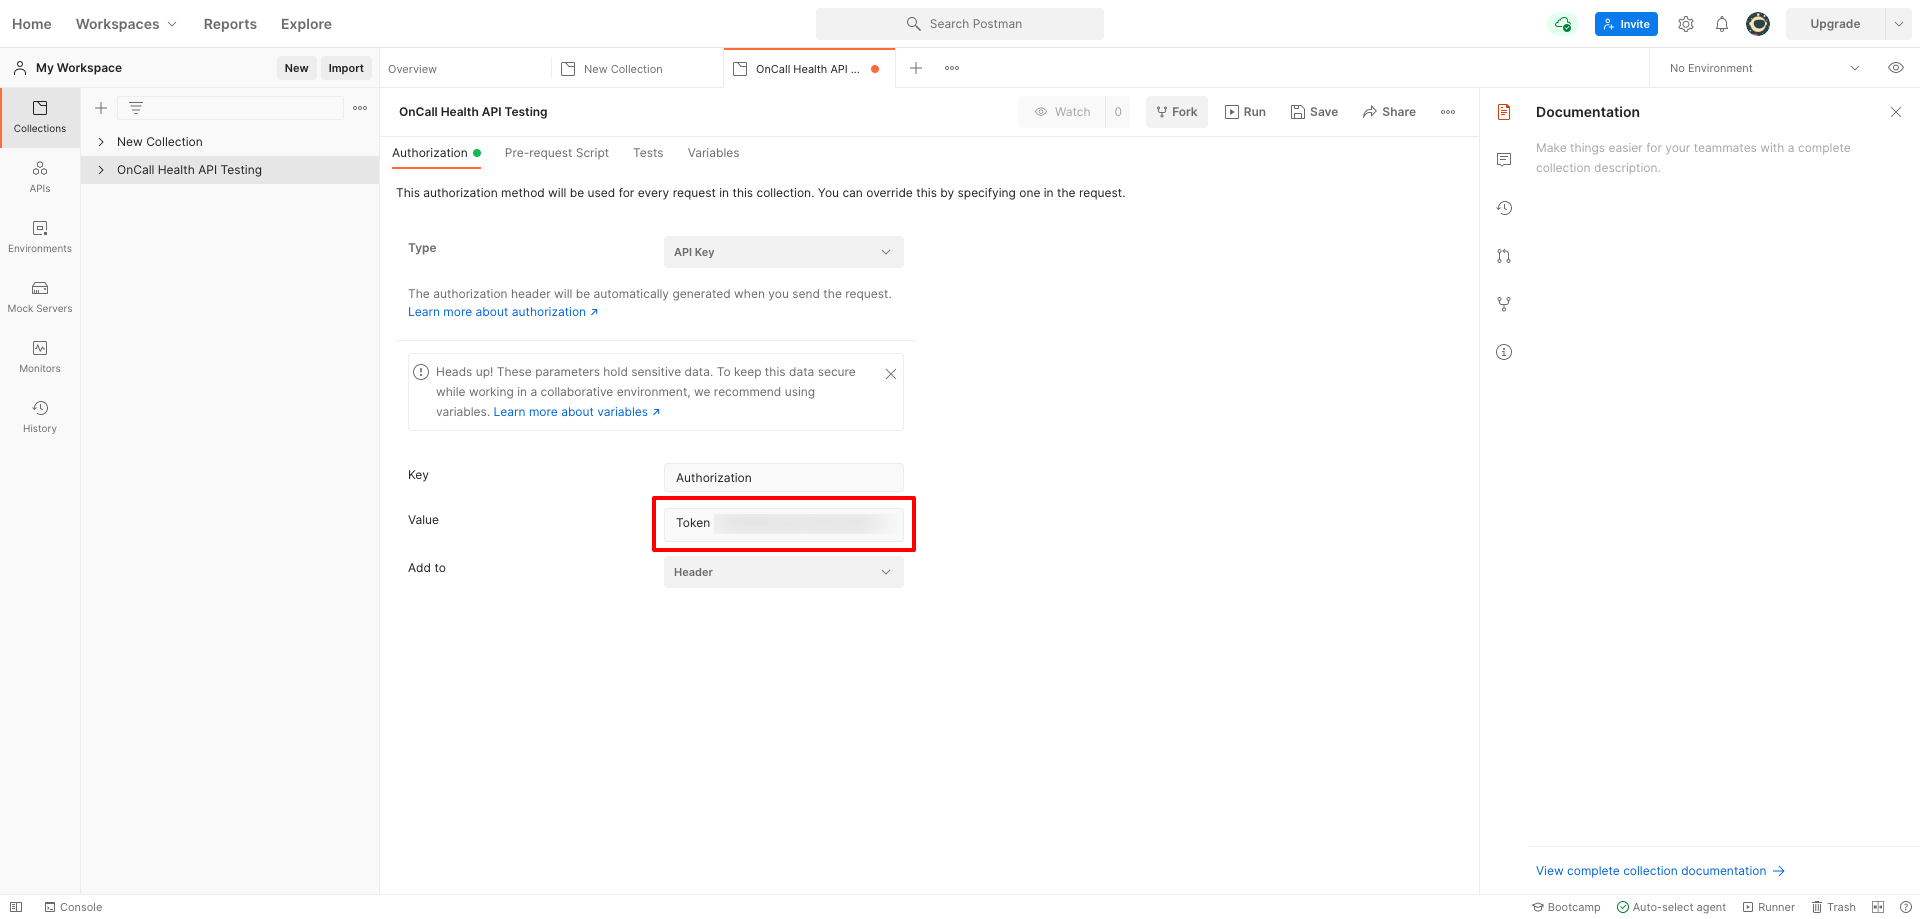
Then, ensure the "Add to" field is set to "Header" and click "Save."
Congratulations – your OnCall Health API key can now be used to authorize requests made within this collection!
Step 5: Open a new tab in Postman
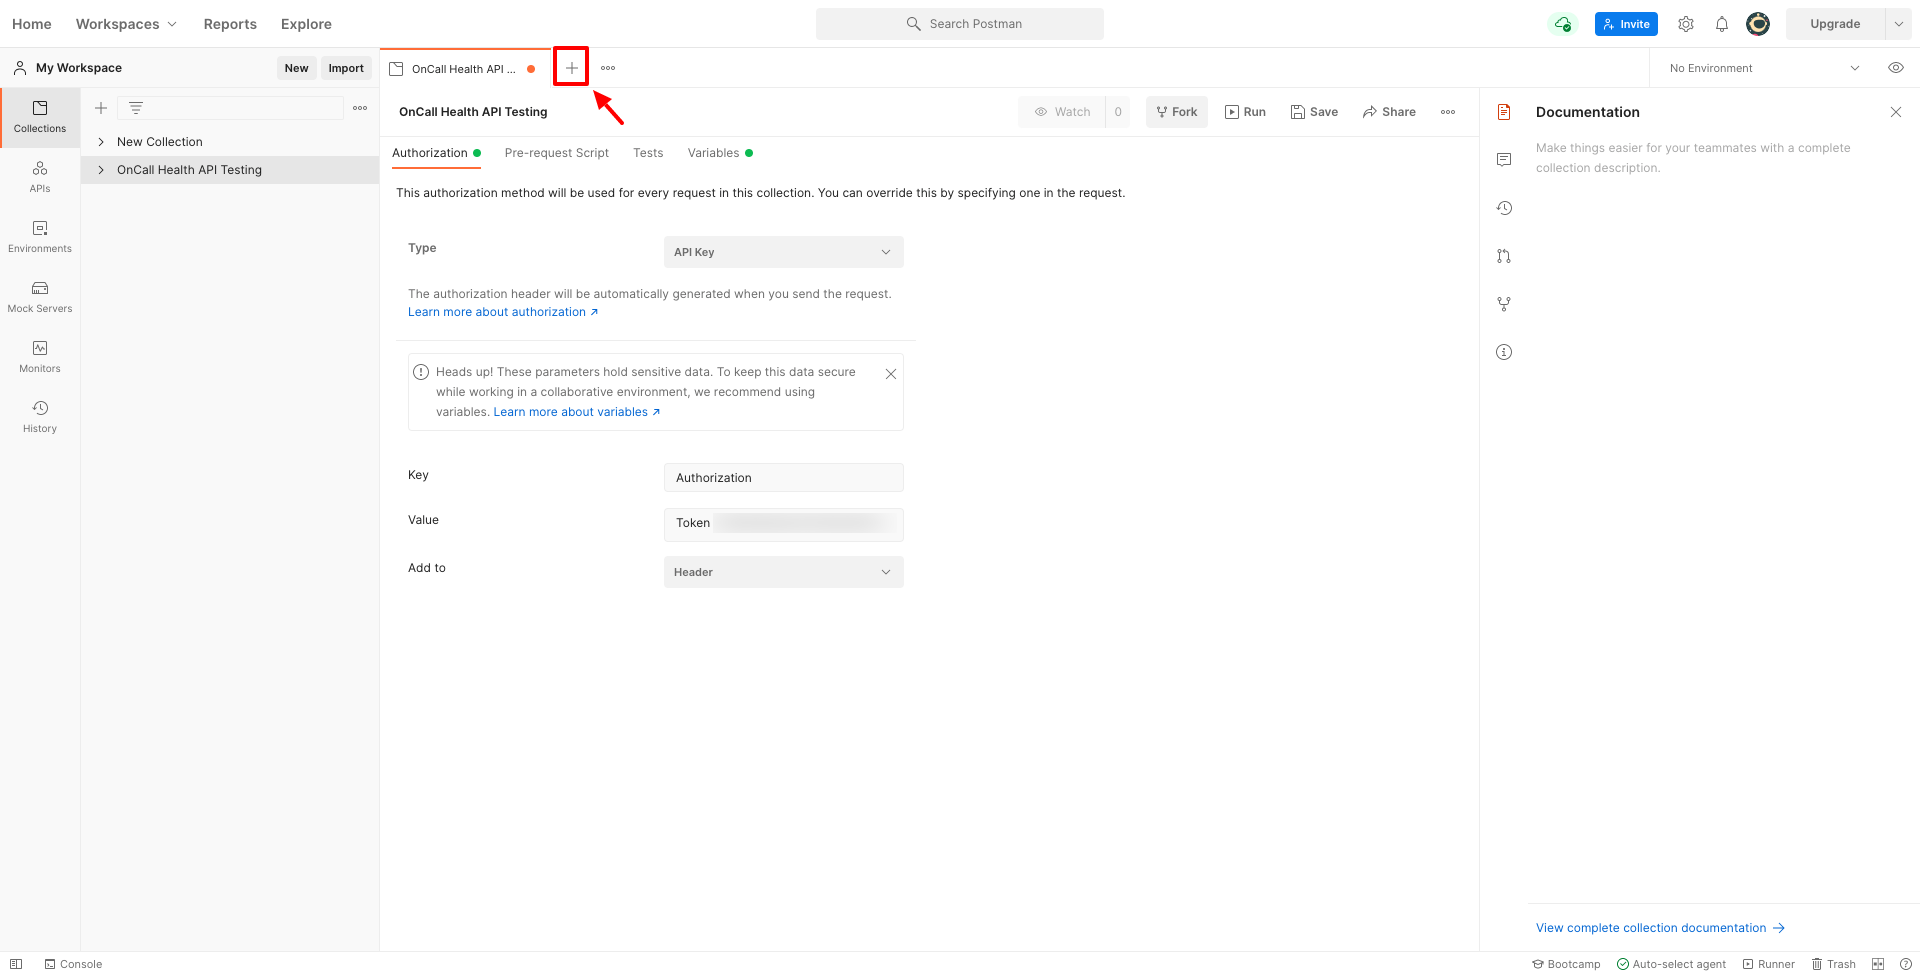
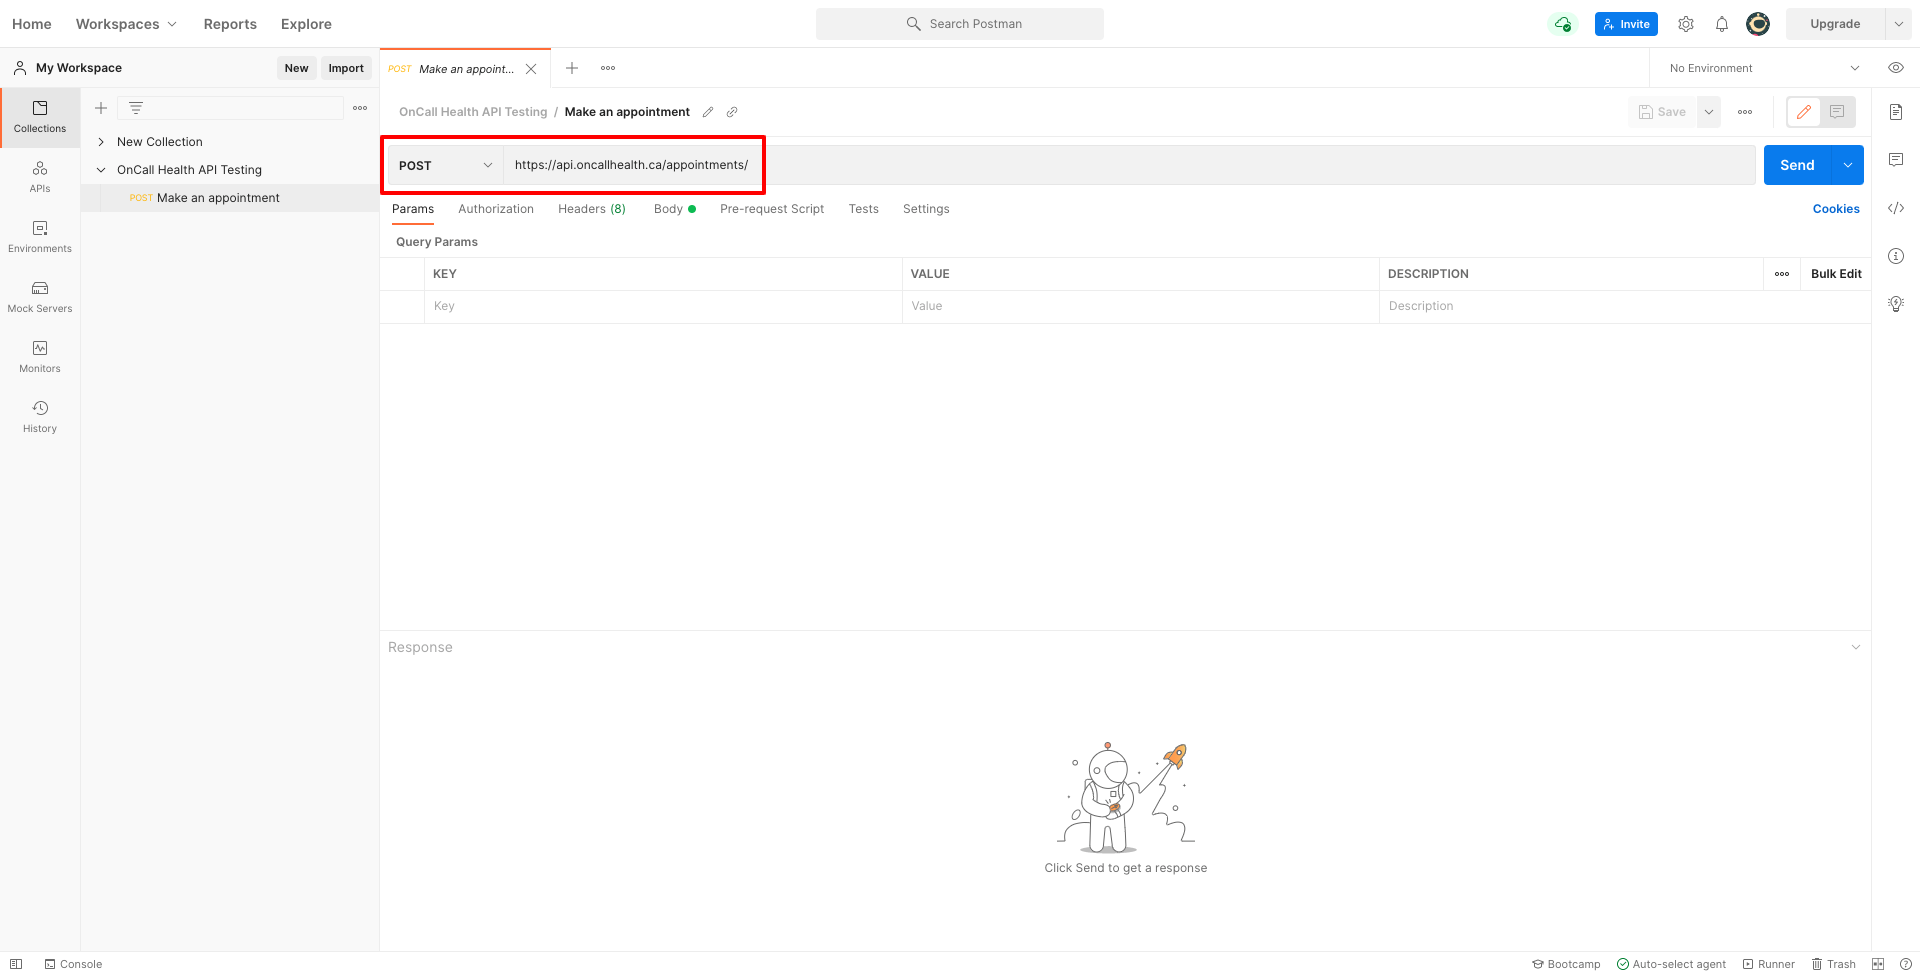
Step 6: Enter the desired OnCall Health API endpoint and method
See our documentation for a full list of endpoints and their corresponding methods.
Let's try the https://api.oncallhealth.ca/appointments/ endpoint. Making a POST request here will allow us to create an appointment via the API.
Note
If your organization is based in the United States, replace .ca in any endpoint with .us (i.e. https://api.oncallhealth.ca/appointments/ becomes https://api.oncallhealth.us/appointments/).
OnCall Health stores data separately in either country to ensure HIPAA and PHIPA compliance.
Step 7: Save your request to the collection you named in Step 3
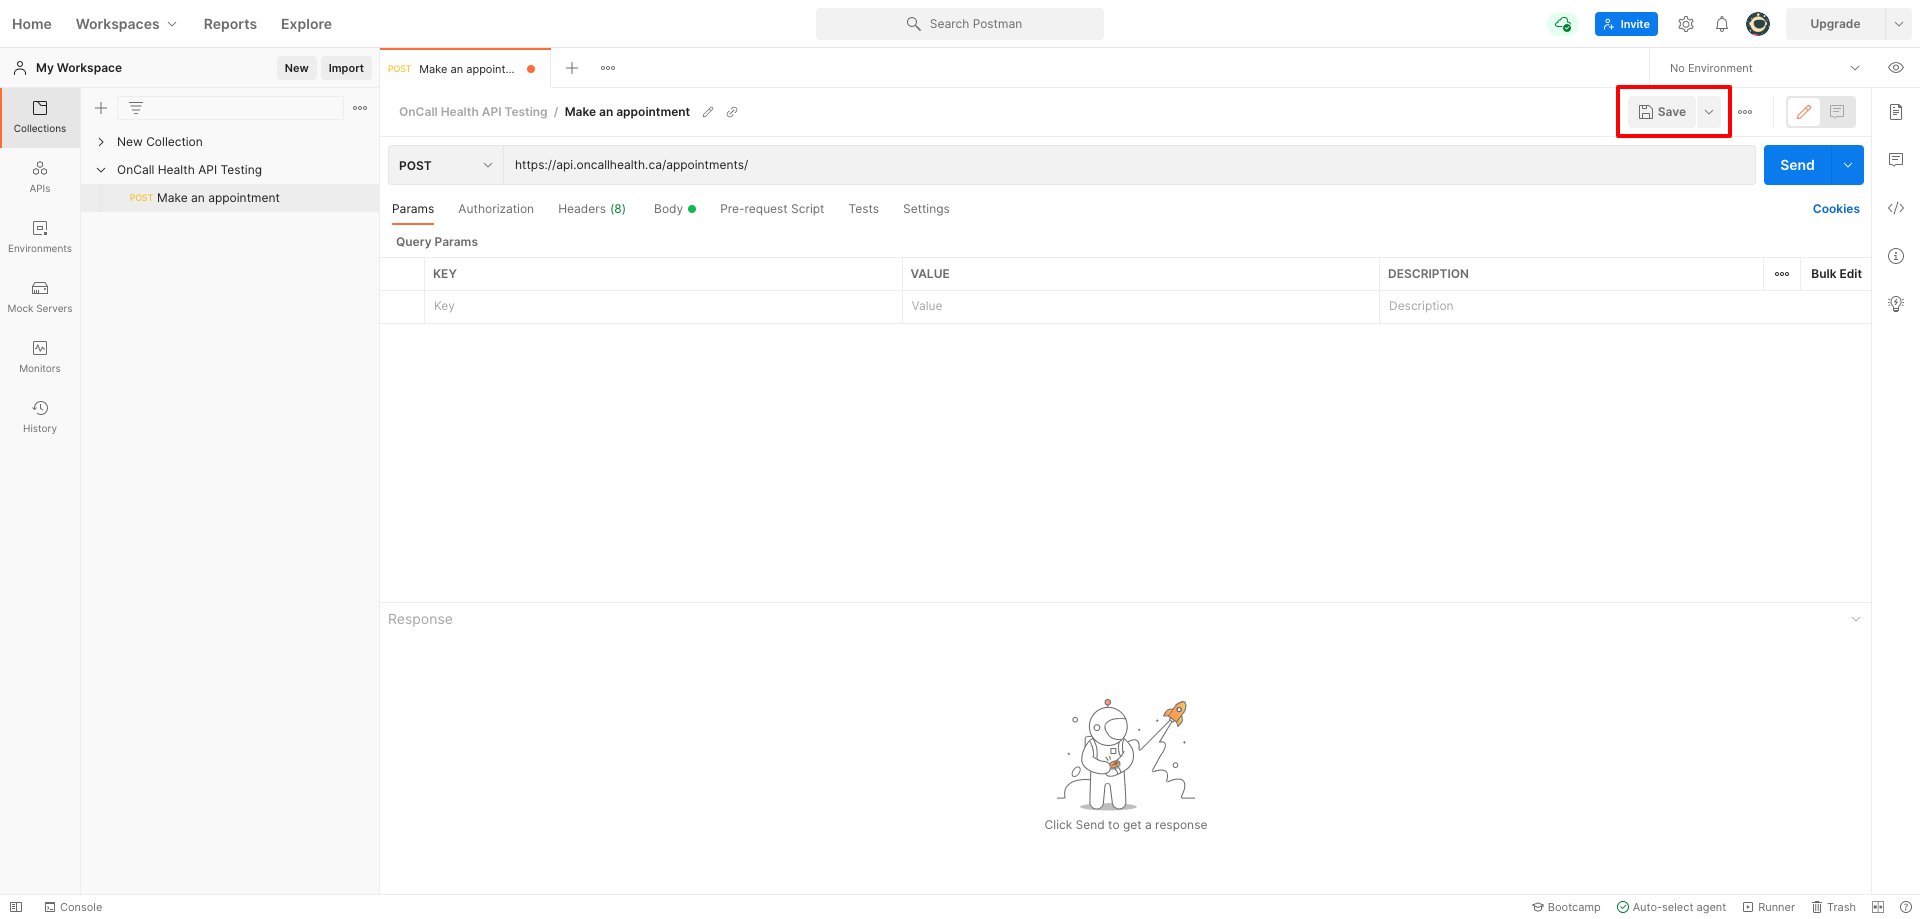
Click "Save" to begin the process.
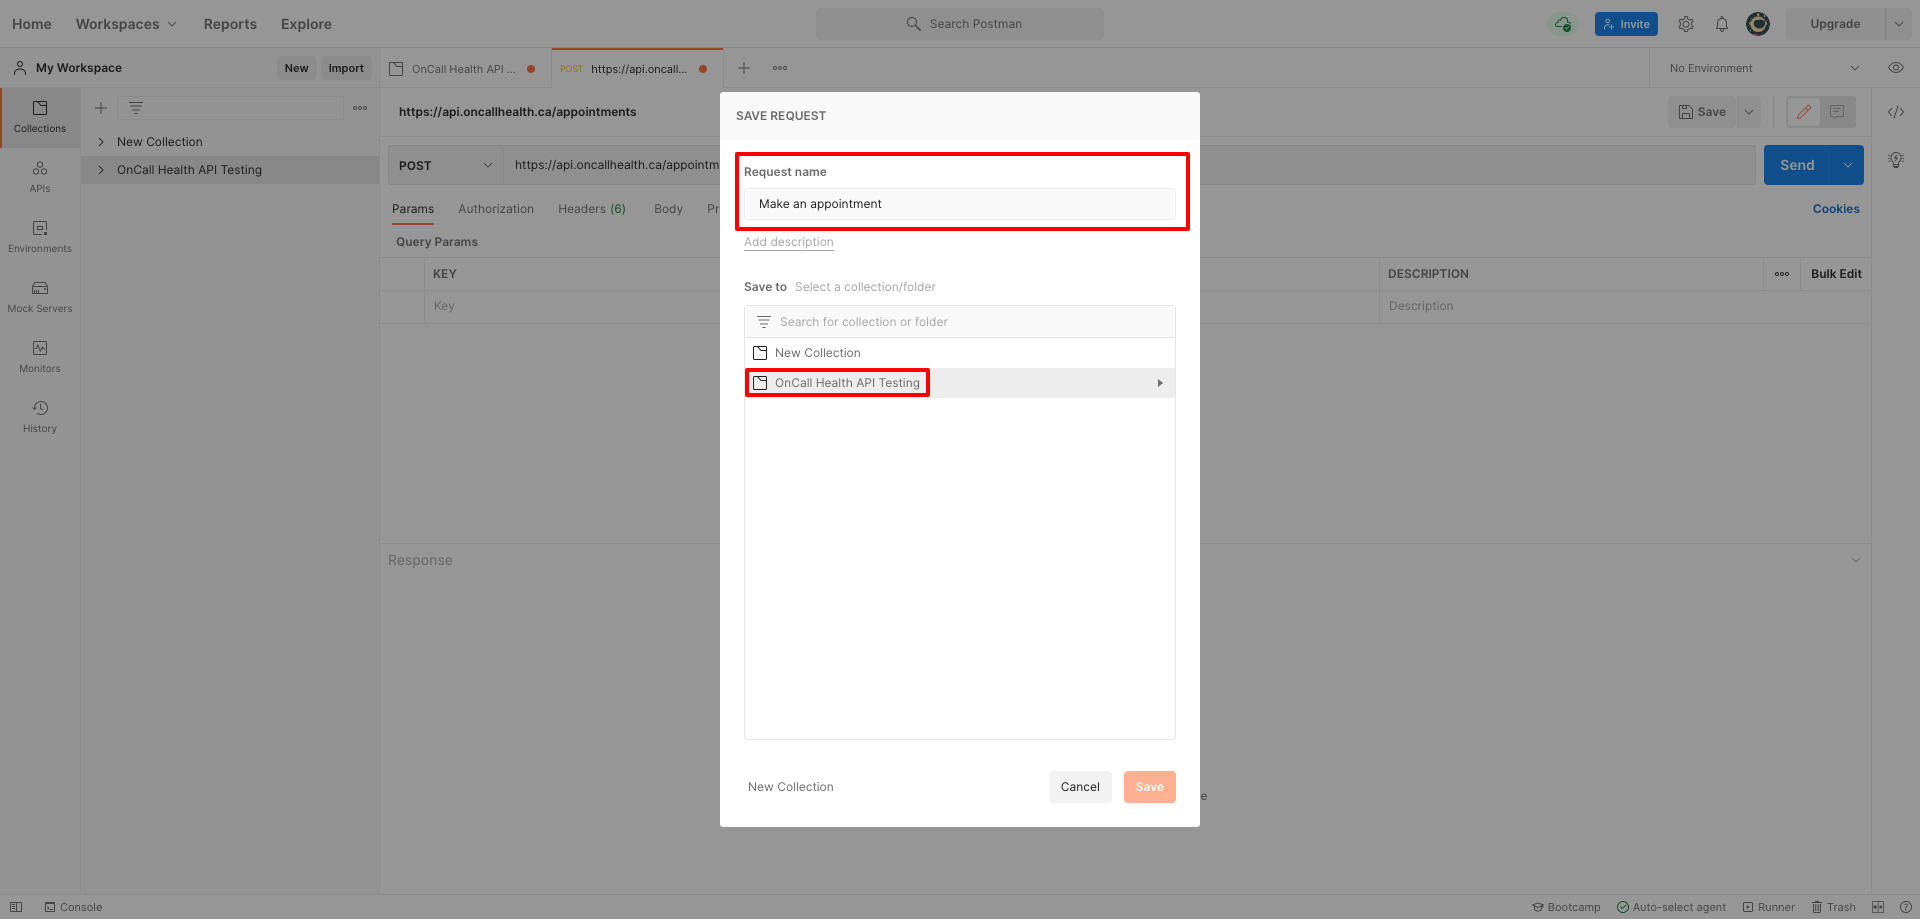
Next, give your request a descriptive name (i.e. "Make an appointment") and click on your collection in the explorer. This will make your collection's authorization details available to the request.
Once you're done, click the orange "Save" button.
Step 8: Add body parameters
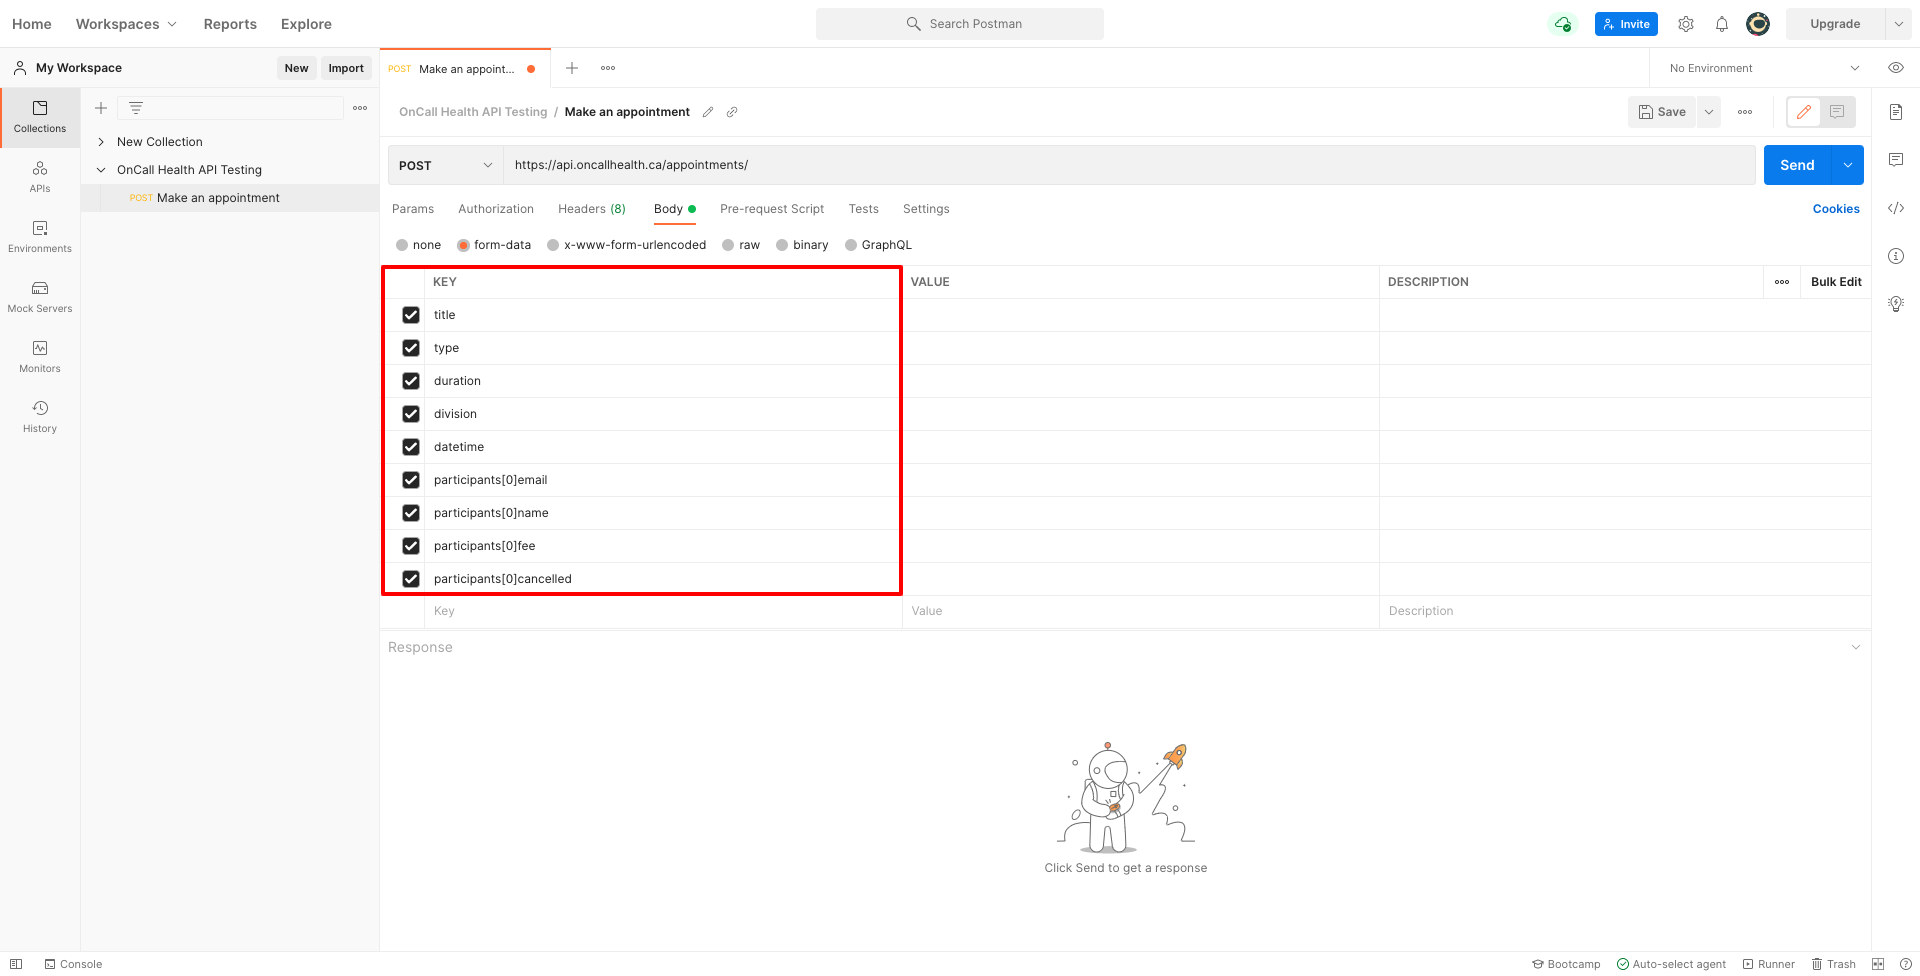
Navigate to the "Body" tab in Postman and click "form-data."
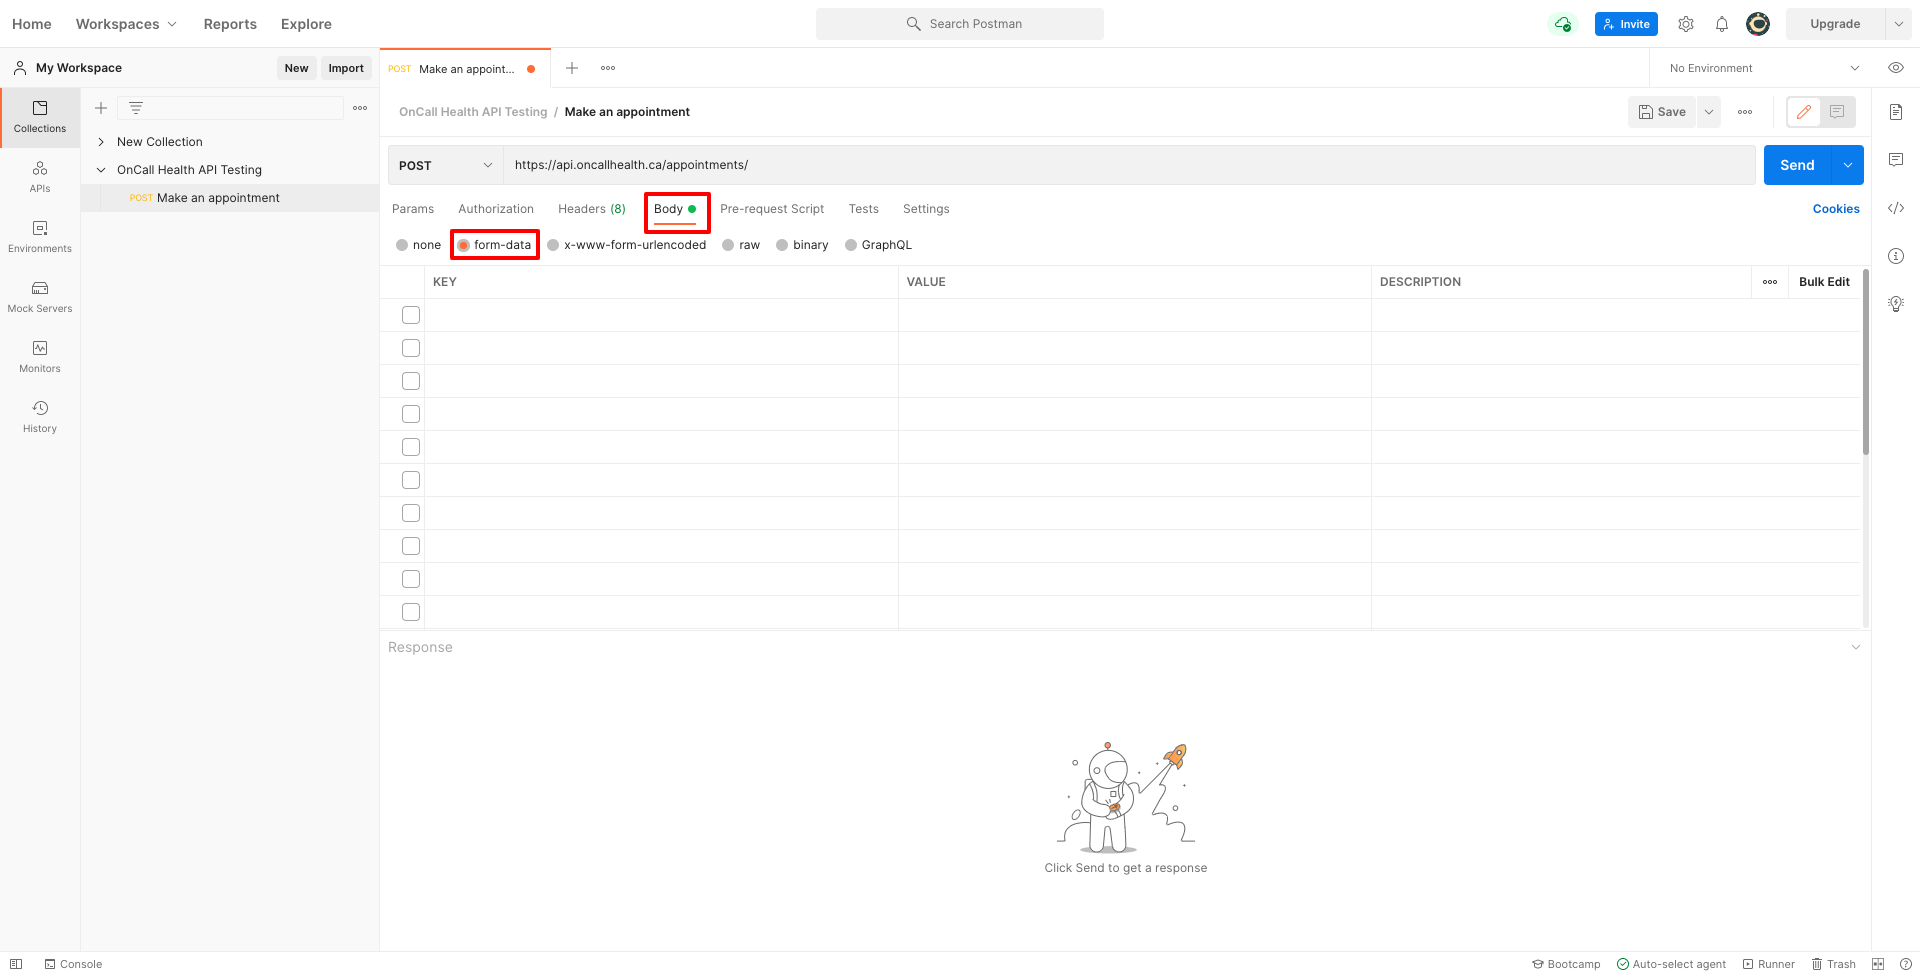
Then, enter the following under the "KEYS" column (one per line):
- title
- type
- duration
- division
- datetime
- participants[0]email
- participants[0]name
- participants[0]fee
- participants[0]cancelled
Your screen in Postman should now look like this:
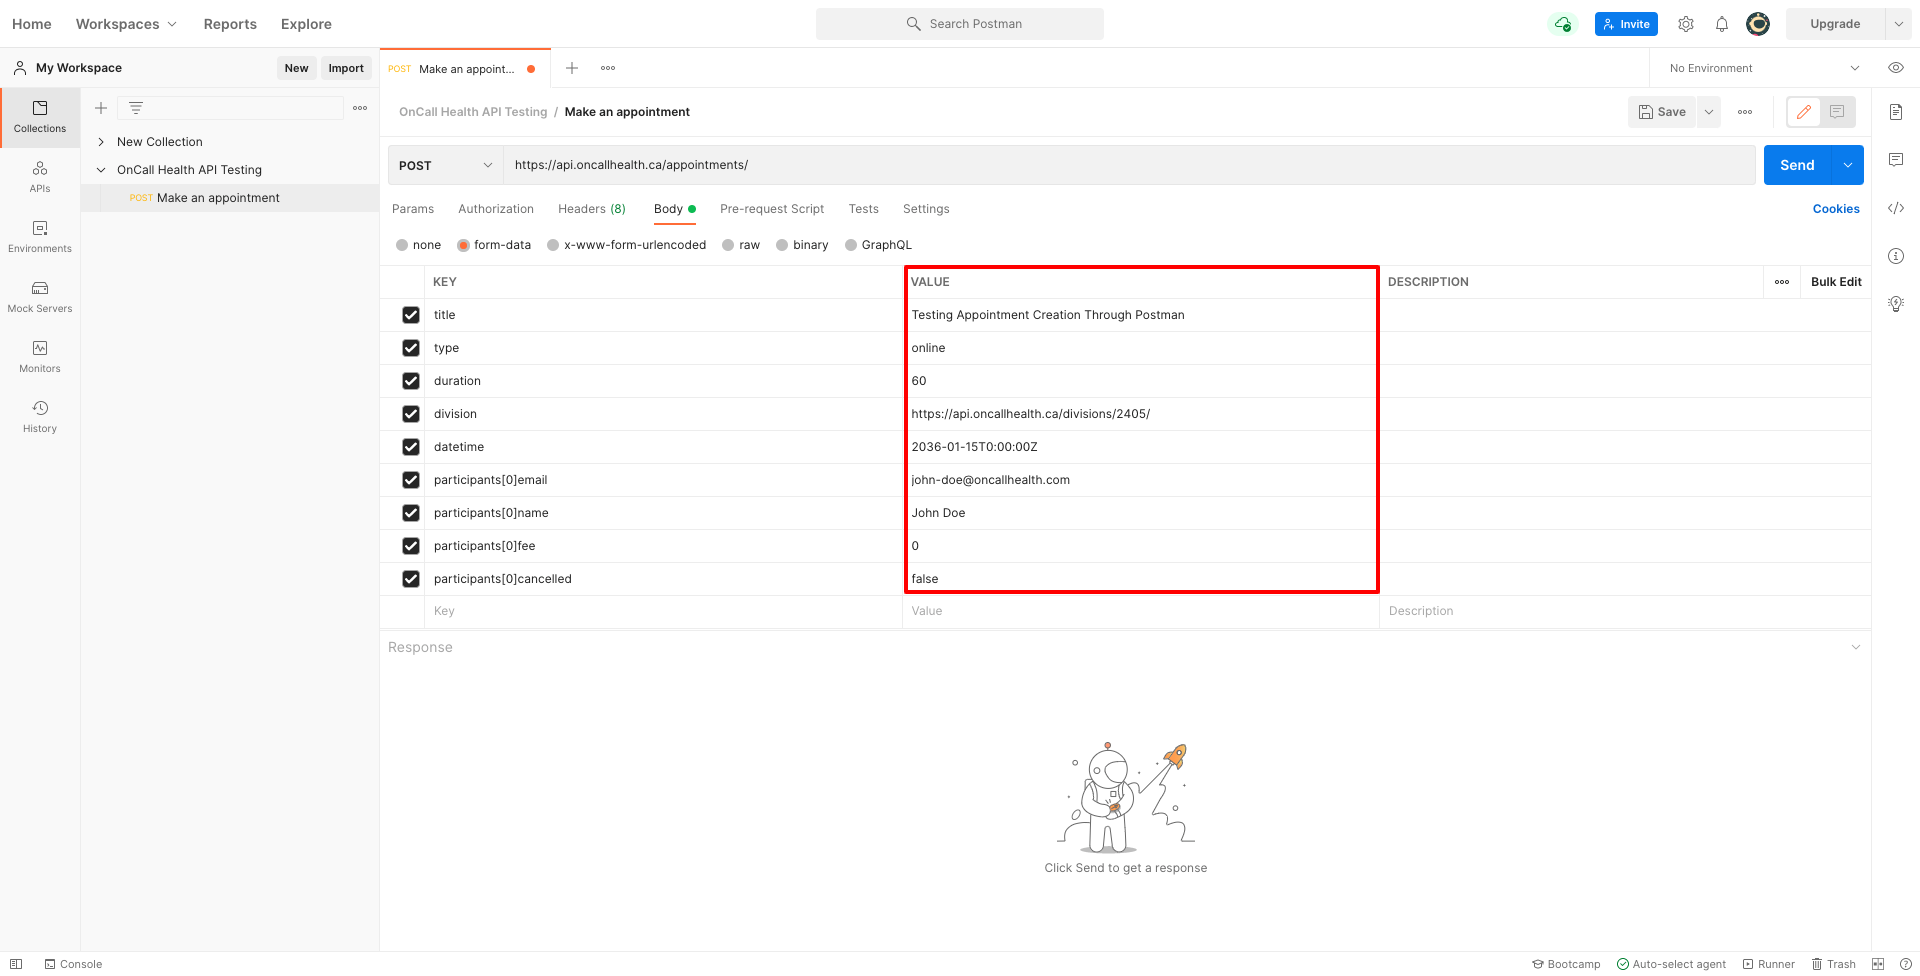
Next, turn your attention to the "VALUE" column. Here's how to fill it out:
- Beside title place whatever you'd like your appointment to be called
- Beside type place one of the following values: "online", "inperson", "phone", "message"
- Beside duration place a value (in minutes) representing the desired duration of your appointment
- Beside division enter the URL to the OnCall Health division in which you'd like to create this appointment (ask your OnCall Health Customer Success Manager if you're unsure what to use)
- Beside datetime enter an ISO8601 representation of when the appointment should be scheduled
- Beside participants[0]email place your email address
- Beside participants[0]name place your full name
- Beside participants[0]fee type "0"
- Beside participants[0]cancelled type "false"
When you're finished, your screen in Postman should resemble this:
Note
If you want to create a test appointment with multiple participants, enter additional participants[0]* keys and increment the value accordingly.
For example, when adding a second participant, use keys that follow the participants[1]* pattern.
Step 9: Hit the blue "Send" button
If you've entered everything correctly, you'll see a response with a status of "201 Created."
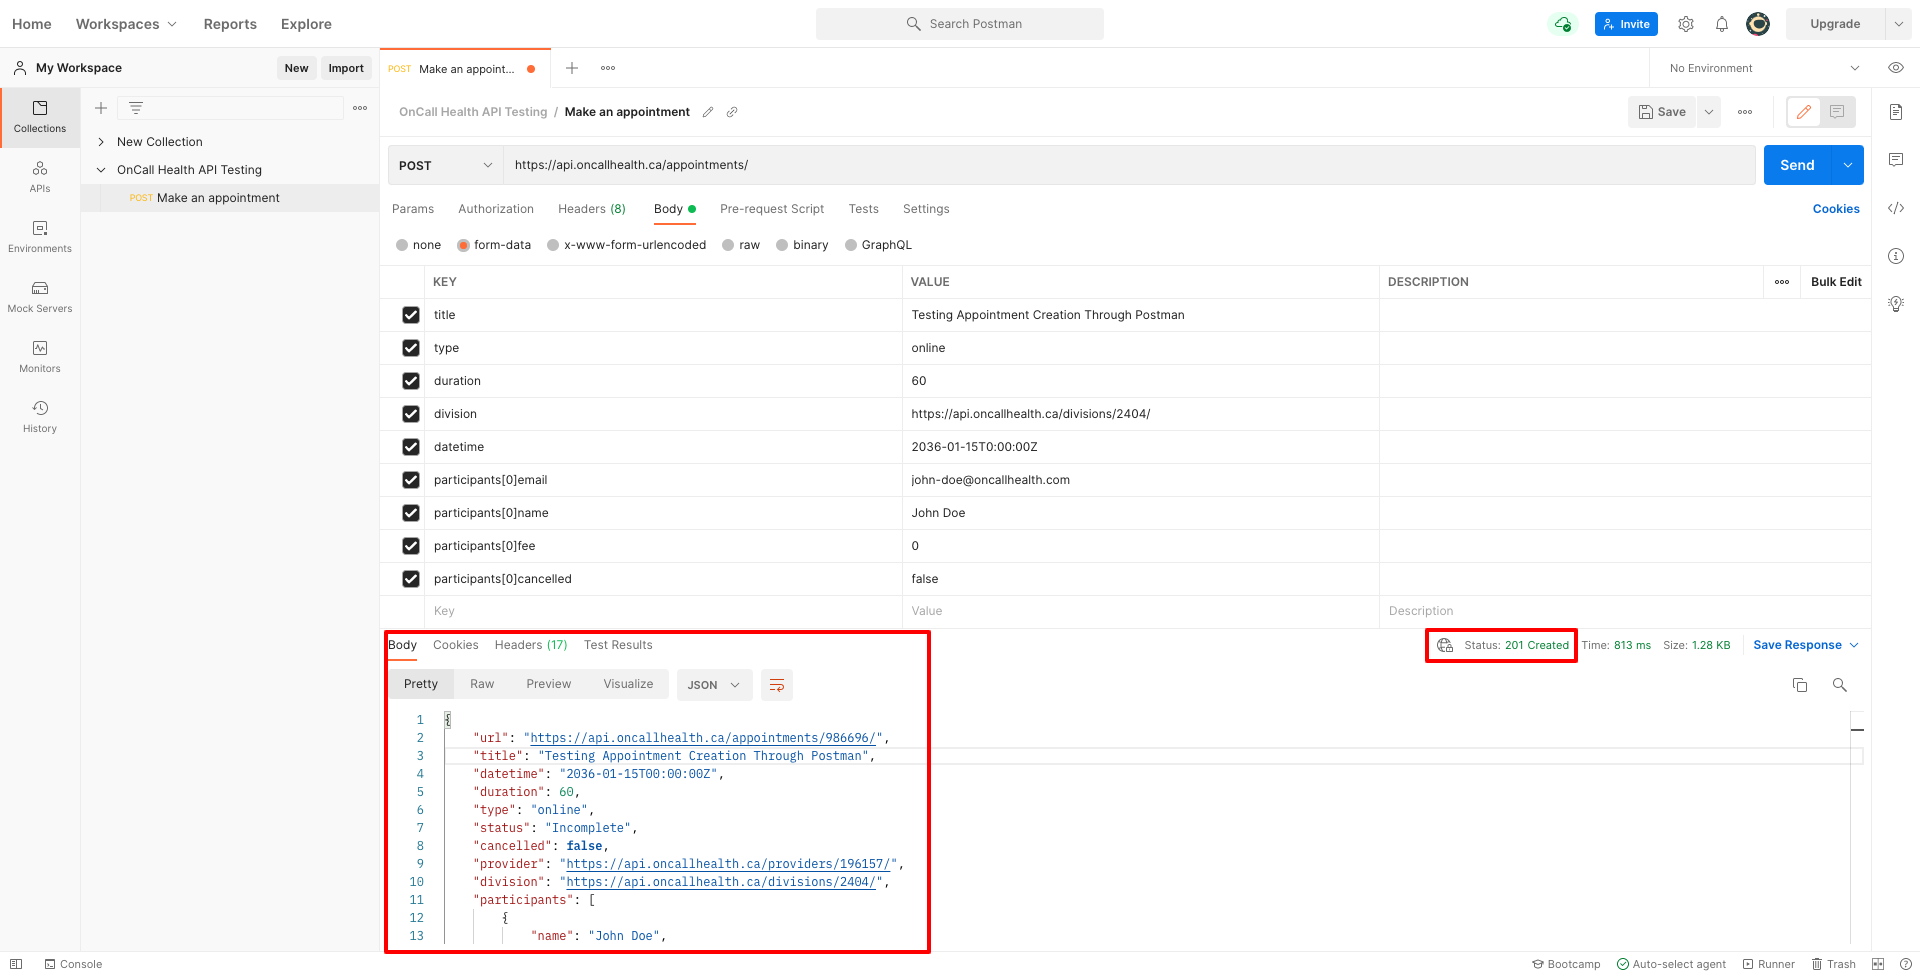
For reference, here's the full response generated by the example request you've been following along with:
{
    "url": "https://api.oncallhealth.ca/appointments/986696/",
    "title": "Testing Appointment Creation Through Postman",
    "datetime": "2036-01-15T00:00:00Z",
    "duration": 60,
    "type": "online",
    "status": "Incomplete",
    "cancelled": false,
    "provider": "https://api.oncallhealth.ca/providers/196157/",
    "division": "https://api.oncallhealth.ca/divisions/2404/",
    "participants": [
        {
            "name": "John Doe",
            "first_name": "John",
            "last_name": "Doe",
            "email": "[email protected]",
            "fee": 0.0,
            "cancelled": false,
            "url": "https://api.oncallhealth.ca/participants/1243811/",
            "appointment": "https://api.oncallhealth.ca/appointments/986696/"
        }
    ],
    "metadata": {}
}
If you receive an error, double-check your authorization and body parameters. Visit the "Errors" section of our API documentation for guidance regarding specific errors.
Next steps
Now that you're set up to test OnCall Health API calls in Postman, the sky's the limit! Try making calls to other endpoints.
We also recommend maintaining your Collection in Postman so you can troubleshoot API calls throughout the process of building and maintaining your application.
For example, if you encounter an error in your development environment, make the same call in Postman and see if it works. If it does, double-check your development environment. If it doesn't, contact your OnCall Health Customer Success Manager.
Updated over 4 years ago